This is a tutorial for creating animations in a 2D panel. While I more or less pick up from the last blog post by martins from 2010, this is not to be considered as a continuation of that.
I am no programmer, and there quite possibly are more ways to achieve the same effect. But nevertheless, this is a working solution, and as I believe there is no other tutorial on animations in a 2D panel, I hope this is helpful for somebody.
We are going to go step for step through the process of recreating a basic function from the periscope of the Mercury capsule.
The periscope was used for navigation, so that the astronaut could orient himself in space, even without other working navigational aids.
It was essentially a window with a wide lens, allowing a high field of view, with several marks on the viewfinder.
You can see them in the Mercury Familiarization Guide here.
We are here implementing what is shown on the right hand page (page 12-5, page 355 in PDF), namely the altitude reticles and 5° pitch and roll reticles.
The 5° reticles showed when the capsule was ±5° from a 14.5° pitch down 0° roll position.
And if the entire Earth fit within the square of the altitude reticles, the capsule was in a perfect 14.5° pitch down 0° roll attitude.
When in the set orientation, the altitude reticles were a clever solution to allow the astronaut to estimate the altitude within an uncertainty of less than 10 km, something that was useful in a time when communications could be very spotty, and had nothing but himself to determine his state.
We begin where the last blog of martins ended.
We have the current code in clbkLoadPanel2D:
where periscopeMesh is a MESHHANDLE type, defined as this in the constructor:
We should also remove the generic HUD from the periscope view, and do this by overloading clbkRenderHUD:
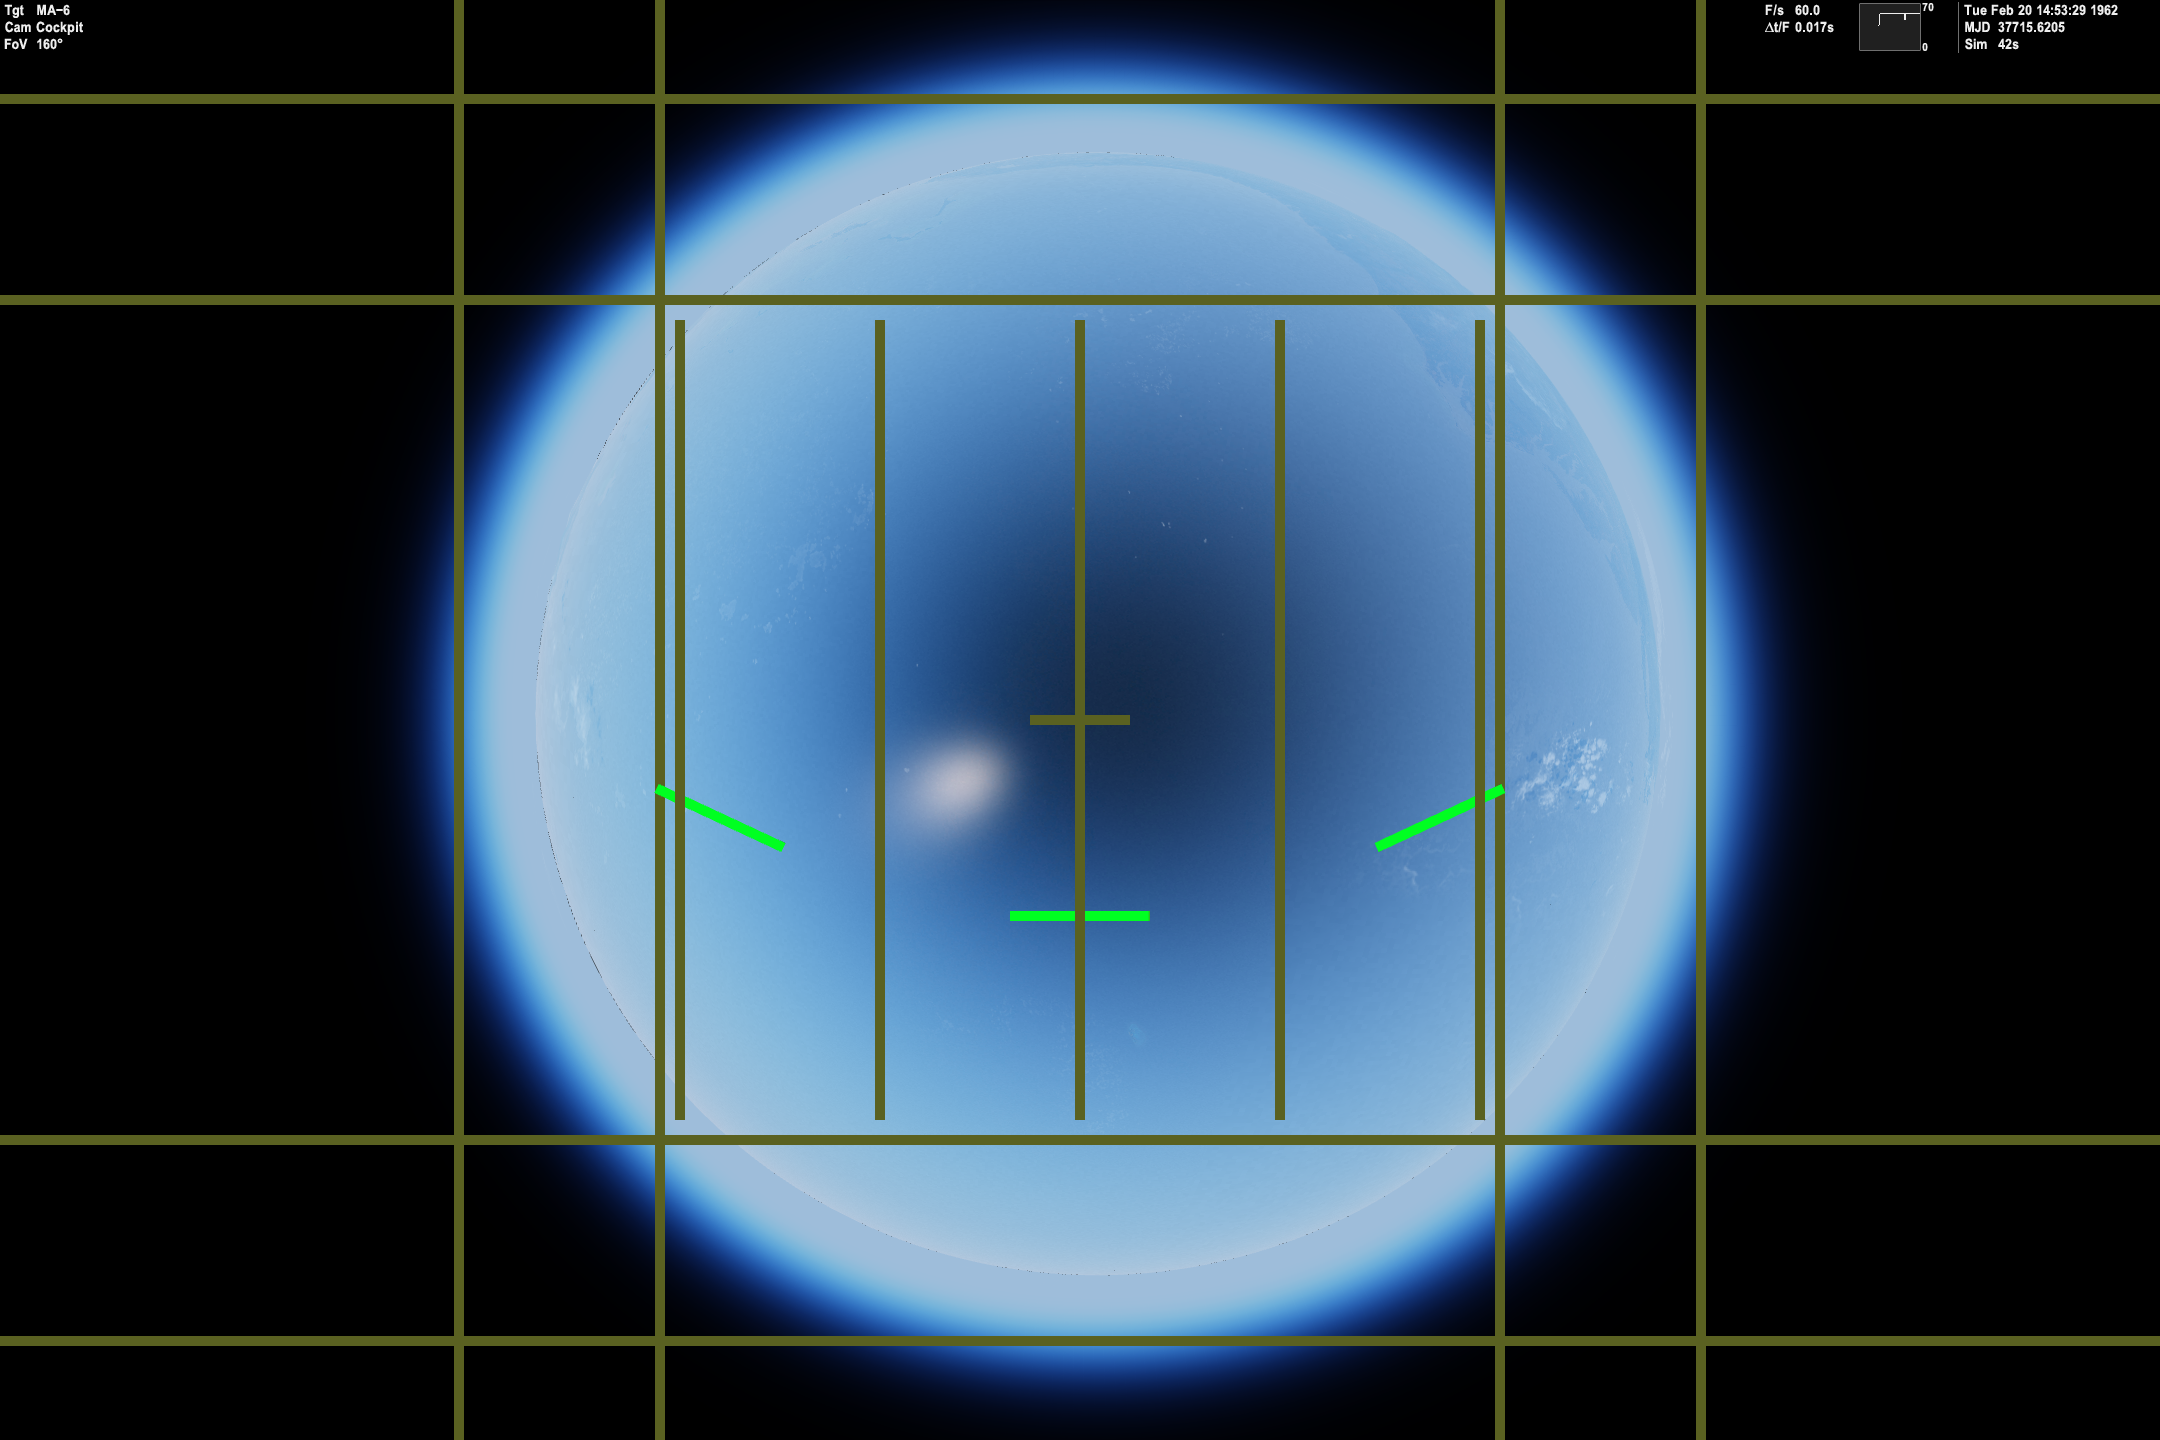
Using the mesh attached to this post, you should now have something like this when you are in the correct attitude (level horizon).
That is all good. Now comes the altitude reticle animation. In the Mercury capsule, the astronaut had a knob which could be rotated between 50 and 250 nautical miles (95 and 465 km), and which would set the altitude and 5° reticles accordingly. We'll use a simple keyboard press, increasing or decreasing the altitude by 5 km.
Now, we can set the altitude, but we have done nothing with the animations yet. It happens in our function SetPeriscopeAltitude. We define it like so:
We actually do not animate per se, but instead edit the mesh itself on the fly, using oapiEditMeshGroup.
If you look in the PeriscopeInternalPanel.msh mesh file, you can see that the mesh groups that we want to edit are the first eight (four sides of altitude reticle square and four sides of 5° reticle square, in the following order: BOX0_RIGHT, BOX5_RIGHT, BOX0_DOWN, BOX5_DOWN, BOX0_LEFT, BOX5_LEFT, BOX0_UP, BOX5_UP).
When we edit the mesh group, we are going to totally replace the x-positions of the left and right reticles (move to the sides), and similarly replace the y-positions of the up and down reticles (move vertically).
We just start with the right altitude reticle (BOX0_RIGHT).
It is defined in the mesh file like this:
We define the function SetPeriscopeAltitude like this:
You may notice that I've simply added the generic pixel displacement vertexDisplacement0. We want the reticle to be positioned so that it aligns with the position of the Earth's horizon on our screen. This is simply a task of calibration, and I've done it for you already.
The pixel displacement of the horizon of the Earth from screen centre is quite accurately described by the equation [math]8000 \times inpAlt^{-0.52}[/math] (inputAltitude in km), which in C++ is written as
The pixel distance from centre of screen to Earth's horizon when the orientation is 5° off-centre, is by the way given by
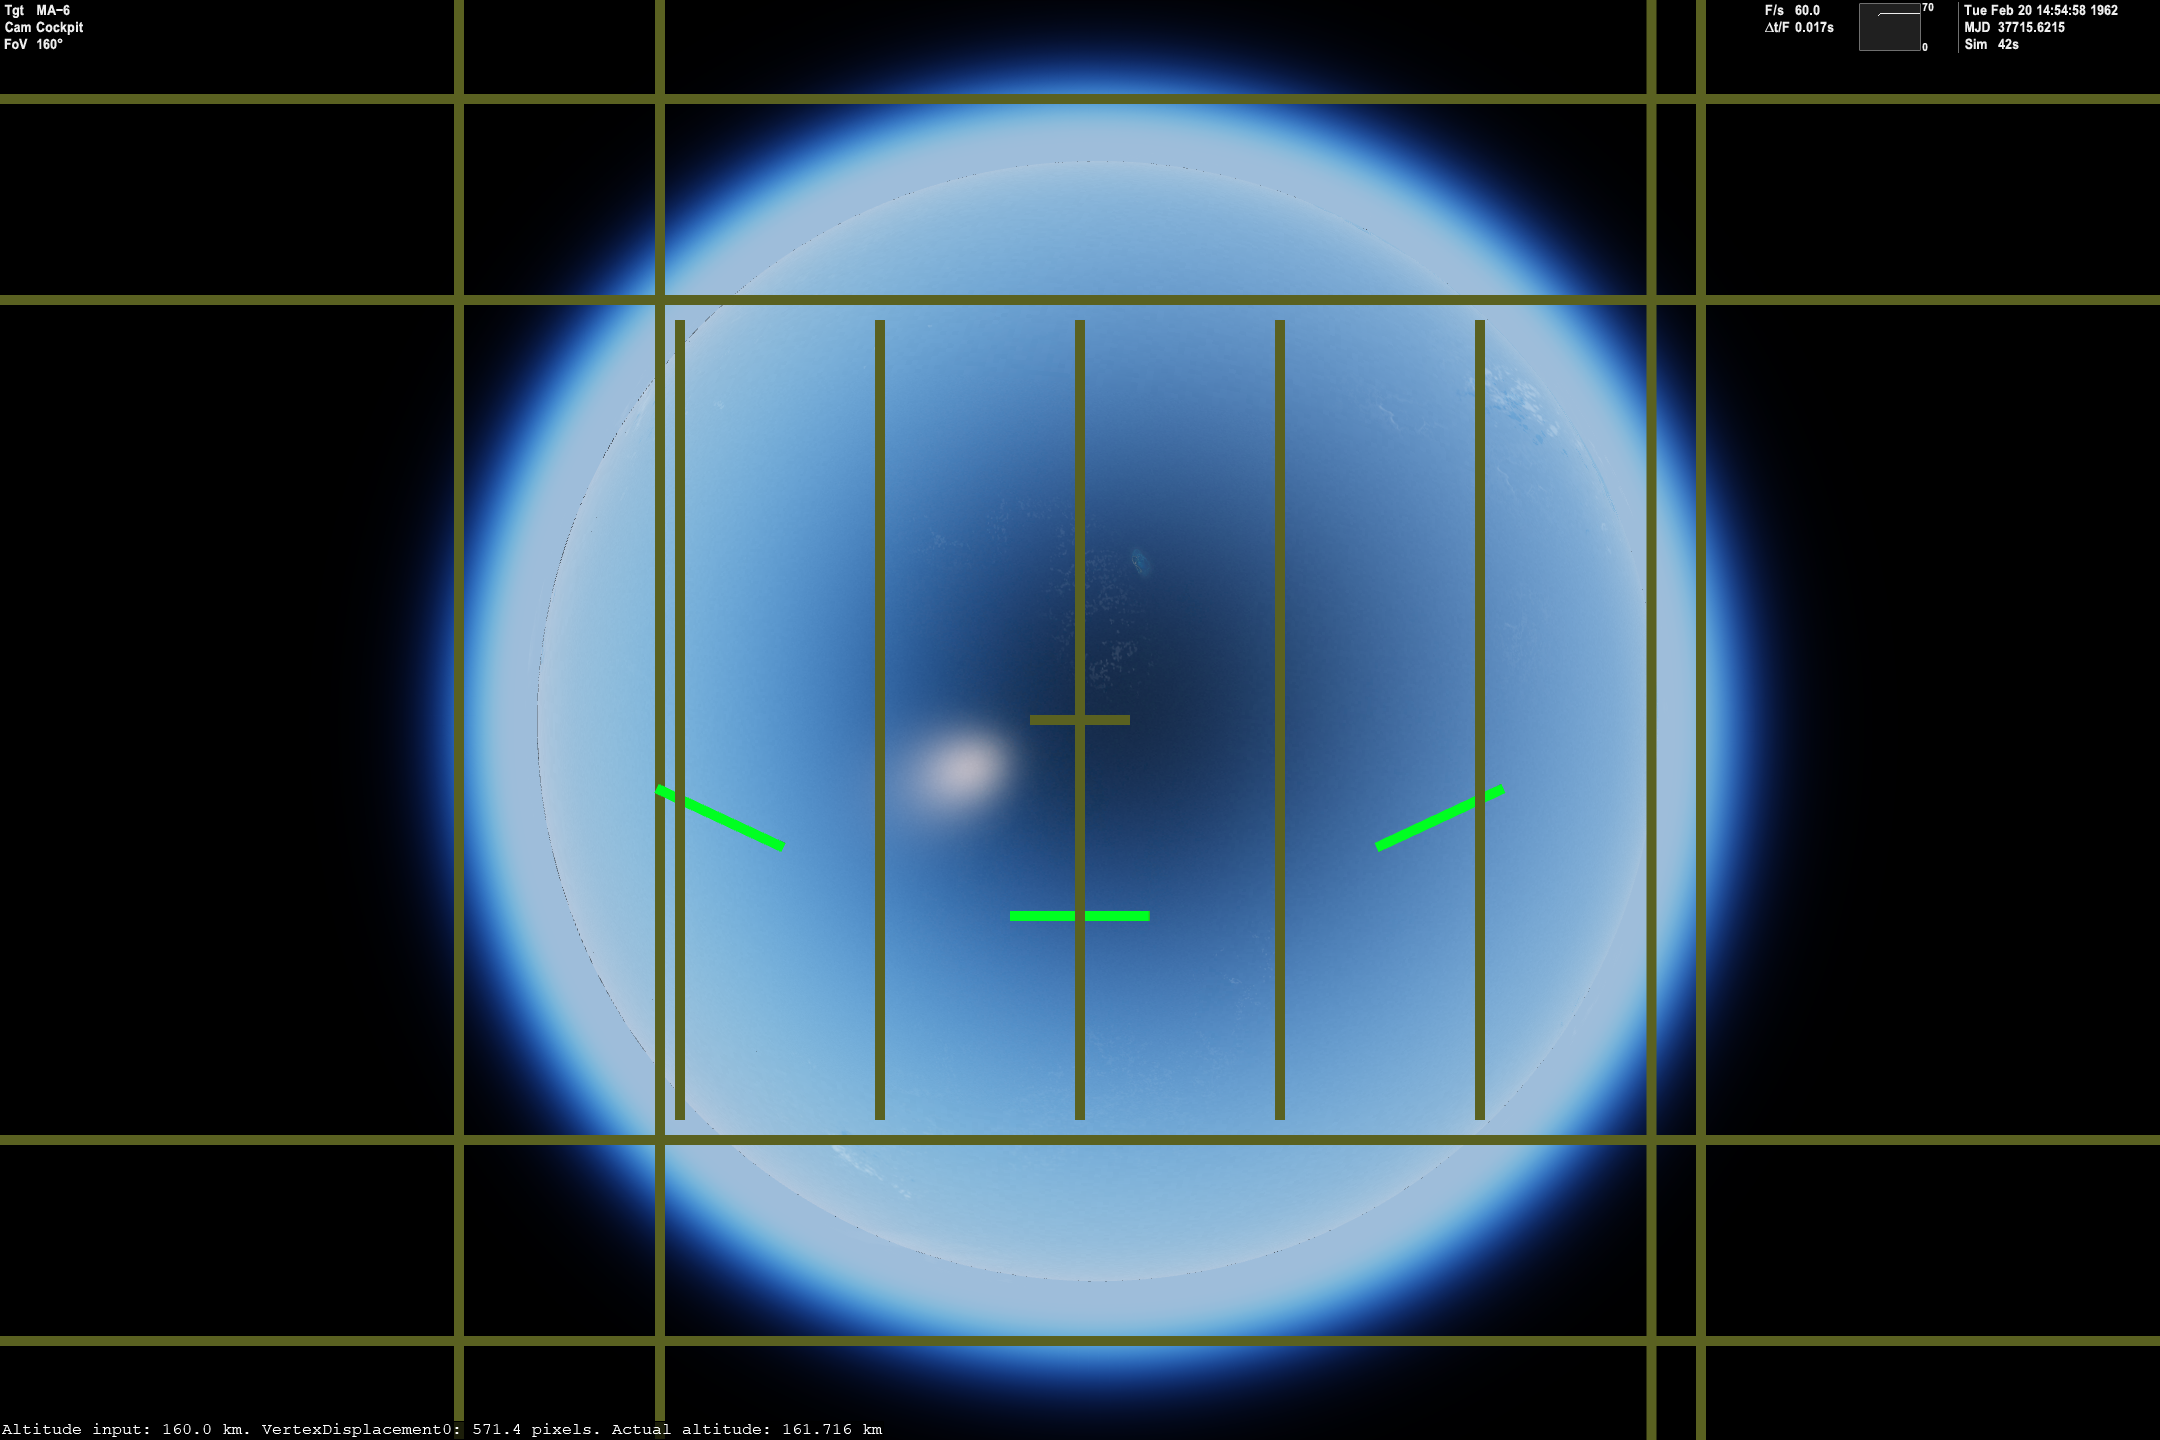
Now, if we compile and run, we should get something like the screenshot below.
If we increase the altitude, and fit the reticle to the horizon again, we get this.
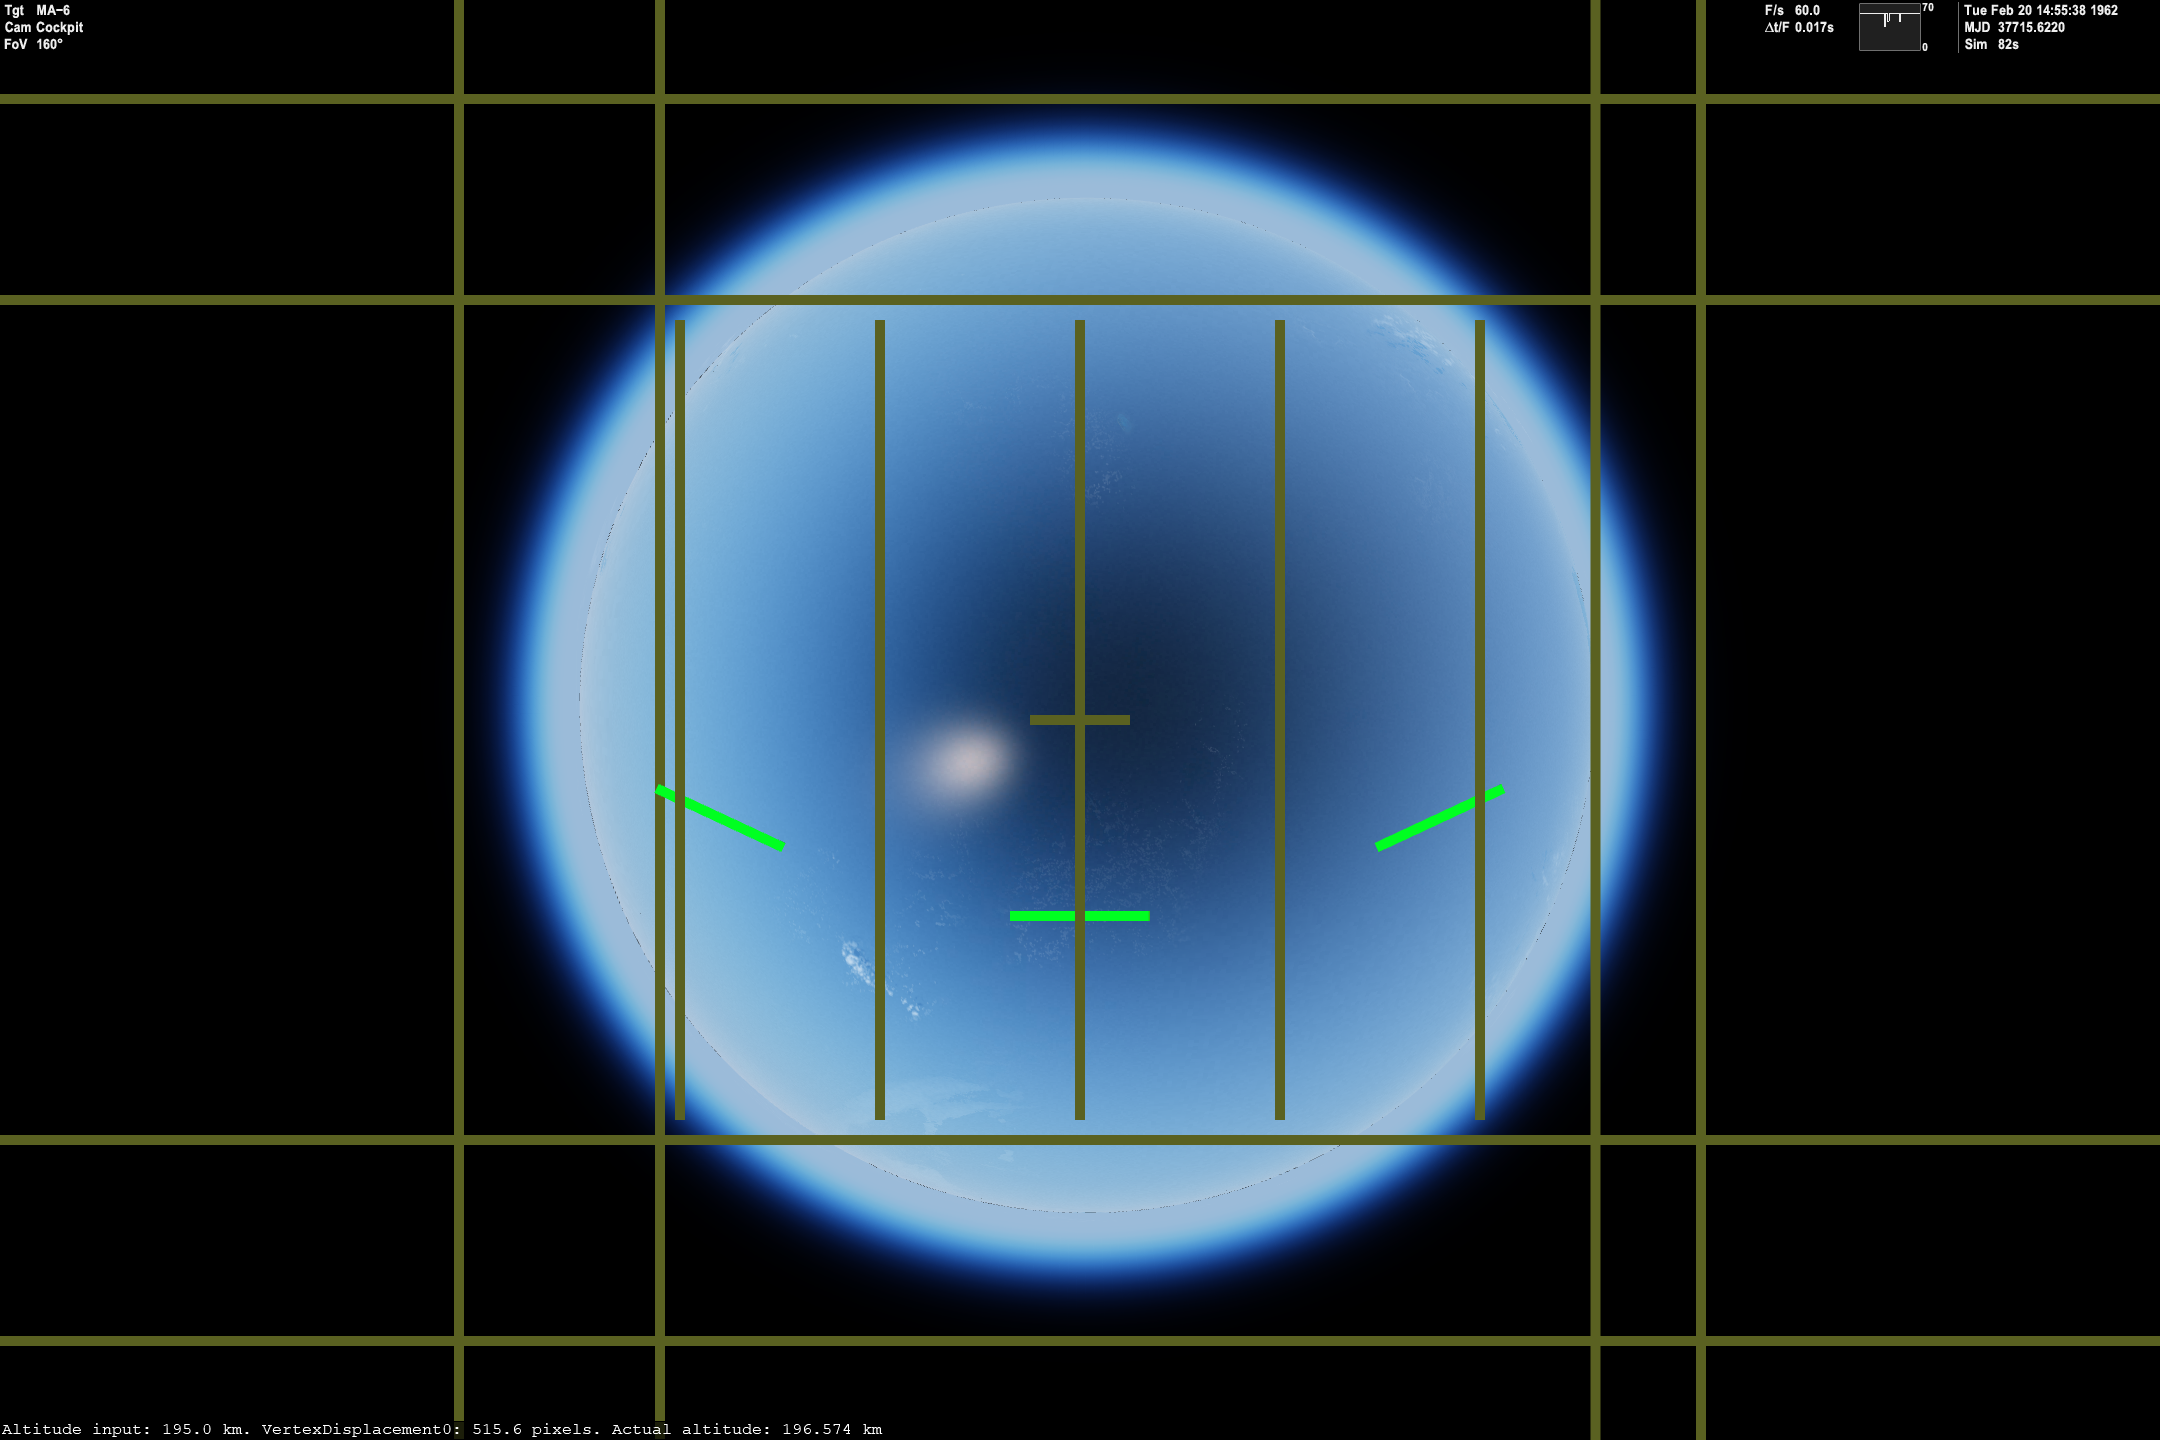
Pretty darn good!
We're almost there!
First, we need to implement the same group edits for the remaining 7 reticles. One can then just copy and paste the preceding SetPeriscopeAltitude code seven times. But remember to change from GRPEDIT_VTXCRDX to GRPEDIT_VTXCRDY when editing BOX0_DOWN, BOX5_DOWN, BOX0_UP and BOX5_UP, and also changing from NTVERTEX x component to y component! I've spent a few hours trying to fix my problems, when it was simply this small blunder.
You may want to generalise this as you're basically doing the same thing eight times. Here's what I ended up with (I've outsourced vertexDisplacement0 to its own function):
Finally, you'll maybe notice that when you load a scenario, the periscope reticles will be uninitialised until you actually adjust the inputAltitude.
This is fixed by calling the SetPeriscopeAltitude function after Orbiter has finished loading:
Congratulations! You have completed this exercise!
If you want to go into even more detail of what I've done, the entire source code is included in the Project Mercury X addon. The functions we have covered today are inside the MercuryCapsule.h, MercuryAtlas.cpp and VirtualCockpit.h files, with the definitions located in MercuryAtlas.h.
I am no programmer, and there quite possibly are more ways to achieve the same effect. But nevertheless, this is a working solution, and as I believe there is no other tutorial on animations in a 2D panel, I hope this is helpful for somebody.
We are going to go step for step through the process of recreating a basic function from the periscope of the Mercury capsule.
The periscope was used for navigation, so that the astronaut could orient himself in space, even without other working navigational aids.
It was essentially a window with a wide lens, allowing a high field of view, with several marks on the viewfinder.
You can see them in the Mercury Familiarization Guide here.
We are here implementing what is shown on the right hand page (page 12-5, page 355 in PDF), namely the altitude reticles and 5° pitch and roll reticles.
The 5° reticles showed when the capsule was ±5° from a 14.5° pitch down 0° roll position.
And if the entire Earth fit within the square of the altitude reticles, the capsule was in a perfect 14.5° pitch down 0° roll attitude.
When in the set orientation, the altitude reticles were a clever solution to allow the astronaut to estimate the altitude within an uncertainty of less than 10 km, something that was useful in a time when communications could be very spotty, and had nothing but himself to determine his state.
We begin where the last blog of martins ended.
We have the current code in clbkLoadPanel2D:
PHP:
bool ProjectMercury::clbkLoadPanel2D(int id, PANELHANDLE hPanel, DWORD viewW, DWORD viewH)
{
	const DWORD PANEL2D_WIDTH = 2160; // Panel mesh width, and my screen width
	const DWORD PANEL2D_HEIGHT = 1440; // Panel mesh height, and my screen height
	double defaultScale = (double)viewH / PANEL2D_HEIGHT; // Scale factor to fit periscope to any user's screen.
	double panelScale = max(defaultScale, 1.0);
	SURFHANDLE panelTexture;

	switch (id)
	{
	case 0: // periscope
		// Here we implement the periscope. F8 to get to periscope, and no on screen information. Seems reasonable

		// First all the FOV and other basic stuff
		periscope = true;

		SetCameraDefaultDirection(_V(0, -1, 0)); // actual periscope pointed 14.5 deg from nadir, but here we use straight down
		oapiCameraSetCockpitDir(0, 0); // Rotate camera to desired direction
		SetCameraRotationRange(0, 0, 0, 0); // Make camera fixed
		oapiCameraSetAperture(175.0 * RAD / 2.0); // actually was 175 deg, but Orbiter only supports up to 160, so it will be truncated.
		// End FOV and other basic stuff

		// Here comes periscope indicators
		panelTexture = oapiGetTextureHandle(periscopeMesh, 1);

		SetPanelBackground(hPanel, 0, 0, periscopeMesh, PANEL2D_WIDTH, PANEL2D_HEIGHT, 0UL, PANEL_ATTACH_TOP | PANEL_ATTACH_BOTTOM);

		SetPanelScaling(hPanel, defaultScale, panelScale);
		// End periscope indicators

		return true;
	default:
		return false;
	}
}
PHP:
periscopeMesh = oapiLoadMeshGlobal("ProjectMercury\\PeriscopeInternalPanel");We should also remove the generic HUD from the periscope view, and do this by overloading clbkRenderHUD:
PHP:
void ProjectMercury::clbkRenderHUD(int mode, const HUDPAINTSPEC* hps, SURFHANDLE hDefaultTex)
{
	if (periscope)
	{
		return; // i.e. supress HUD. Else let HUD show
	}
}
Using the mesh attached to this post, you should now have something like this when you are in the correct attitude (level horizon).
That is all good. Now comes the altitude reticle animation. In the Mercury capsule, the astronaut had a knob which could be rotated between 50 and 250 nautical miles (95 and 465 km), and which would set the altitude and 5° reticles accordingly. We'll use a simple keyboard press, increasing or decreasing the altitude by 5 km.
PHP:
int ProjectMercury::clbkConsumeBufferedKey(DWORD key, bool down, char* kstate)
{
	if (!down) return 0; // only process keydown events

	if (!KEYMOD_CONTROL(kstate) && !KEYMOD_ALT(kstate) && !KEYMOD_SHIFT(kstate)) // No ctrl, alt or shift
	{
		switch (key)
		{
		case OAPI_KEY_B: // Increase
			if (periscope)
			{
				if (periscopeAltitude < 465.0) // 50 to 250 nautical miles, which I convert to 95 to 465 km
				{
					periscopeAltitude += 5.0;

					SetPeriscopeAltitude(periscopeAltitude);
				}
			}

			return 1;
		case OAPI_KEY_V:
			if (periscope)
			{
				if (periscopeAltitude > 95.0) // 50 to 250 nautical miles, which I convert to 95 to 465 km
				{
					periscopeAltitude -= 5.0;

					SetPeriscopeAltitude(periscopeAltitude);
				}
			}

			return 1;
		}
	}
	return 0;
}
Now, we can set the altitude, but we have done nothing with the animations yet. It happens in our function SetPeriscopeAltitude. We define it like so:
We actually do not animate per se, but instead edit the mesh itself on the fly, using oapiEditMeshGroup.
If you look in the PeriscopeInternalPanel.msh mesh file, you can see that the mesh groups that we want to edit are the first eight (four sides of altitude reticle square and four sides of 5° reticle square, in the following order: BOX0_RIGHT, BOX5_RIGHT, BOX0_DOWN, BOX5_DOWN, BOX0_LEFT, BOX5_LEFT, BOX0_UP, BOX5_UP).
When we edit the mesh group, we are going to totally replace the x-positions of the left and right reticles (move to the sides), and similarly replace the y-positions of the up and down reticles (move vertically).
We just start with the right altitude reticle (BOX0_RIGHT).
It is defined in the mesh file like this:
Code:
LABEL BOX0_RIGHT
MATERIAL 0
TEXTURE 1
GEOM 4 2
1495.0 1440.0 0.0000 0.0000 0.0000 -1.000 0.6000 0.0000 ; centered at pixel 1500 in x, stretching from bottom (1440 pixel in y)
1495.0 0.0000 0.0000 0.0000 0.0000 -1.000 1.0000 0.0000 ; 											to top (0 pixel in y)
1505.0 0.0000 0.0000 0.0000 0.0000 -1.000 0.6000 0.4000
1505.0 1440.0 0.0000 0.0000 0.0000 -1.000 1.0000 0.4000 ; thus reticle width is 10 pixels (1505 - 1495 = 10).
0 1 2 ; the two triangles making up the reticle
0 2 3
PHP:
void ProjectMercury::SetPeriscopeAltitude(double inputAltitude)
{
	const double reticleWidth = 10.0; // width of our reticle in pixels.

	const double centreX = 2160.0 / 2.0; // my screen and mesh is width 2160, so centre is half of that
	const double centreY = 1440.0 / 2.0; // my screen and mesh is height 1440, so centre is half of that

	const int box0rightGrp = 0; // mesh group index of BOX0_RIGHT
	const int totalVertices = 4; // we are editing a total of four vertices.

	WORD vertexIndex[totalVertices] = { 0, 1, 2, 3}; // index of the four vertices. Simply all four.
	GROUPEDITSPEC gesRight0;
	gesRight0.flags = GRPEDIT_VTXCRDX; // We're editing the x-coordinate of the vertex.
	gesRight0.nVtx = totalVertices; // number of vertices we're editing, 4.
	gesRight0.vIdx = vertexIndex; // the indices of the four vertices: {0, 1, 2, 3}

	NTVERTEX newVertexRight[totalVertices]; // This will be where we define the four new vertices.

	double vertexDisplacement0 = 8.0e3 * pow(inputAltitude, -0.52);

	newVertexRight[0].x = float(centreX - reticleWidth / 2.0 + vertexDisplacement0);
	newVertexRight[1].x = float(centreX - reticleWidth / 2.0 + vertexDisplacement0); // position is centre of screen, minus the width of reticle, and finally the displacement
	newVertexRight[2].x = float(centreX + reticleWidth / 2.0 + vertexDisplacement0); // position is centre of screen, plus the width of reticle, and finally the displacement
	newVertexRight[3].x = float(centreX + reticleWidth / 2.0 + vertexDisplacement0);

	gesRight0.Vtx = newVertexRight; // load in the four new vertex x-positions

	oapiEditMeshGroup(periscopeMesh, box0rightGrp, &gesRight0); // Do the magic. This is where we actually perform the mesh transformation.


	// Add debug string to show how we're doing
	sprintf(oapiDebugString(), "Altitude input: %.1f km. VertexDisplacement0: %.1f pixels. Actual altitude: %.3f km", inputAltitude, vertexDisplacement0, GetAltitude() / 1e3);
}
You may notice that I've simply added the generic pixel displacement vertexDisplacement0. We want the reticle to be positioned so that it aligns with the position of the Earth's horizon on our screen. This is simply a task of calibration, and I've done it for you already.
The pixel displacement of the horizon of the Earth from screen centre is quite accurately described by the equation [math]8000 \times inpAlt^{-0.52}[/math] (inputAltitude in km), which in C++ is written as
PHP:
double vertexDisplacement0 = 8.0e3 * pow(inputAltitude, -0.52);
PHP:
double vertexDisplacement5 = 2.4e4 * pow(inputAltitude, -0.65);Now, if we compile and run, we should get something like the screenshot below.
If we increase the altitude, and fit the reticle to the horizon again, we get this.
Pretty darn good!
We're almost there!
First, we need to implement the same group edits for the remaining 7 reticles. One can then just copy and paste the preceding SetPeriscopeAltitude code seven times. But remember to change from GRPEDIT_VTXCRDX to GRPEDIT_VTXCRDY when editing BOX0_DOWN, BOX5_DOWN, BOX0_UP and BOX5_UP, and also changing from NTVERTEX x component to y component! I've spent a few hours trying to fix my problems, when it was simply this small blunder.
You may want to generalise this as you're basically doing the same thing eight times. Here's what I ended up with (I've outsourced vertexDisplacement0 to its own function):
PHP:
void ProjectMercury::SetPeriscopeAltitude(double inputAltitude)
{
	const int totalGroupNumber = 8;

	//											 0r	 5r	 0d	 5d	 0l	 5l	 0u	 5u
	const int reticleGroup[totalGroupNumber] = { 0, 1, 2, 3, 4, 5, 6, 7 };

	const double reticleWidth = 10.0;

	const double centreX = 2160.0 / 2.0;
	const double centreY = 1440.0 / 2.0;

	const int totalVertices = 4;
	static WORD vertexIndex[totalVertices] = { 0, 1, 2, 3 };

	double vertexDisplacement0, vertexDisplacement5;
	GetPixelDeviationForAltitude(periscopeAltitude, &vertexDisplacement0, &vertexDisplacement5);

	for (int i = 0; i < totalGroupNumber; i++)
	{
		double displacement = vertexDisplacement0;
		if (i % 2 == 1) displacement = vertexDisplacement5; // 5 degree displacement

		double displacementSign = 1.0;
		if (i >= 4) displacementSign = -1.0; // negative coordinate

		GROUPEDITSPEC ges;
		NTVERTEX newVertex[totalVertices];

		if (i == 2 || i == 3 || i == 6 || i == 7) // y
		{
			ges.flags = GRPEDIT_VTXCRDY;
			ges.nVtx = totalVertices;
			ges.vIdx = vertexIndex;

			newVertex[0].y = float(centreY + reticleWidth / 2.0 + displacementSign * displacement);
			newVertex[1].y = float(centreY + reticleWidth / 2.0 + displacementSign * displacement);
			newVertex[2].y = float(centreY - reticleWidth / 2.0 + displacementSign * displacement);
			newVertex[3].y = float(centreY - reticleWidth / 2.0 + displacementSign * displacement);

			ges.Vtx = newVertex;
			oapiEditMeshGroup(periscopeMesh, reticleGroup[i], &ges);
		}
		else
		{
			ges.flags = GRPEDIT_VTXCRDX;
			ges.nVtx = 4;
			ges.vIdx = vertexIndex;

			newVertex[0].x = float(centreX - reticleWidth / 2.0 + displacementSign * displacement);
			newVertex[1].x = float(centreX - reticleWidth / 2.0 + displacementSign * displacement);
			newVertex[2].x = float(centreX + reticleWidth / 2.0 + displacementSign * displacement);
			newVertex[3].x = float(centreX + reticleWidth / 2.0 + displacementSign * displacement);

			ges.Vtx = newVertex;
			oapiEditMeshGroup(periscopeMesh, reticleGroup[i], &ges);
		}
	}
}

void ProjectMercury::GetPixelDeviationForAltitude(double inputAltitude, double *deg0Pix, double *deg5Pix)
{
	// We assume exponential dependency. Calibrated by taking screenshots at different heights, and counting pixels.

	if (inputAltitude == NULL) inputAltitude = 160.0; // Default value (and perigee altitude of Mercury capsule)

	// Limits from Mercury Familiarization Guide page 362 (chapter 12-5)
	if (inputAltitude < 50.0 * 1.852) inputAltitude = 50.0 * 1.852;
	if (inputAltitude > 250.0 * 1.852) inputAltitude = 250.0 * 1.852;

	*deg0Pix = 8.0e3 * pow(inputAltitude, -0.52);
	*deg5Pix = 2.4e4 * pow(inputAltitude, -0.65);
}
Finally, you'll maybe notice that when you load a scenario, the periscope reticles will be uninitialised until you actually adjust the inputAltitude.
This is fixed by calling the SetPeriscopeAltitude function after Orbiter has finished loading:
PHP:
void ProjectMercury::clbkVisualCreated(VISHANDLE vis, int refcount)
{
	// Initialise periscope
	SetPeriscopeAltitude(periscopeAltitude);
}
Congratulations! You have completed this exercise!
If you want to go into even more detail of what I've done, the entire source code is included in the Project Mercury X addon. The functions we have covered today are inside the MercuryCapsule.h, MercuryAtlas.cpp and VirtualCockpit.h files, with the definitions located in MercuryAtlas.h.
Attachments
Last edited:


