You are using an out of date browser. It may not display this or other websites correctly.
You should upgrade or use an alternative browser.
You should upgrade or use an alternative browser.
Project XR2 Ravenstar - Mk II
- Thread starter Coolhand
- Start date
- Status
- Not open for further replies.
Well done! You deserve third place AT LEAST for those models.
Congrats!!!
Rtyh-12
Member
You deserve it Coolhand, your model is simply too cool. I can't wait until I get my hands on it and launch it for the very first time! :chainsaw:
P.S.: I have found the thread, and your XR-2 looks better than the winner.
P.S.: I have found the thread, and your XR-2 looks better than the winner.
Last edited:
White Wolf
New member
- Joined
- Nov 2, 2009
- Messages
- 23
- Reaction score
- 0
- Points
- 0
Congrats! can't find the thread but I'm probably just blind. If SFM was less biased toward star trek and star wars you probably would have taken first. I've sen some beautiful models and meshes there, but like C3PO said they were all static renderings. As far as I'm concerned it takes WAY more talent to model something like the MK2 and still have it be a usable vessel considering you have to combine aesthetics with a semi low poly count.
I posted a link just a few pages back i think
Rtyh-12
Member
Or just see this link.
And I just saw Coolhand being a runner-up here, the Best Modeler Award! Congratulations!
And I just saw Coolhand being a runner-up here, the Best Modeler Award! Congratulations!
Axel
Drive Technician
- Joined
- Dec 31, 2008
- Messages
- 229
- Reaction score
- 0
- Points
- 0
C3PO wrote
Ok i repeat my post from 23. decembver 2010,
I don't believe that the MK2 pictures are real time renderings of orbiter, after 5 Years of orbiter using i know which is a orbiter rendering and what is another one! This are renderings of the developing program which Coolhand is using. There are multiple shadows, multiple light sources inside a mesh (orbiter supports it only outside a mesh bug free), to brilliant colors and high quality materials (even not supported in orbiter).
And in the background there are no typical orbiter things, like stars, planets, other ships, ect.
But in every case ofcourse cool pics!
But as long we can not test this awesome machine in orbiter, there is no proof against my assumption. But because its strongly forbidden to ask when there will be a date of releasing, so i dont ask for it.
White Wolf wrote:
Why he has to use semi low poly count? Orbiters dx7-engine is low enough for the year 2011, so we should use the highest level we can get at vessels. And 2011 most orbinauts should have computers which can beat the minimal requirement of orbiter by factor 5-10. My computer is nearly 3 years old and i have no problems with nothing. And it was not the fastest one as i bought it.
It's amazing that a mesh for a real-time sim can compete against meshes made for static rendering.
Ok i repeat my post from 23. decembver 2010,
I don't believe that the MK2 pictures are real time renderings of orbiter, after 5 Years of orbiter using i know which is a orbiter rendering and what is another one! This are renderings of the developing program which Coolhand is using. There are multiple shadows, multiple light sources inside a mesh (orbiter supports it only outside a mesh bug free), to brilliant colors and high quality materials (even not supported in orbiter).
And in the background there are no typical orbiter things, like stars, planets, other ships, ect.
But in every case ofcourse cool pics!
But as long we can not test this awesome machine in orbiter, there is no proof against my assumption. But because its strongly forbidden to ask when there will be a date of releasing, so i dont ask for it.
White Wolf wrote:
you have to combine aesthetics with a semi low poly count.
Why he has to use semi low poly count? Orbiters dx7-engine is low enough for the year 2011, so we should use the highest level we can get at vessels. And 2011 most orbinauts should have computers which can beat the minimal requirement of orbiter by factor 5-10. My computer is nearly 3 years old and i have no problems with nothing. And it was not the fastest one as i bought it.
Last edited:
Well, that's obvious enough. The whole point here is that the XR-2 Mk.II mesh can both perform well in a game and look good in a render.I don't believe that the MK2 pictures are real time renderings of orbiter, after 5 Years of orbiter using i know which is a orbiter rendering and what is another one!
There is a big difference between a computer that can easily run Orbiter and a gaming machine.And 2011 most orbinauts should have computers which can beat the minimal requirement of orbiter by factor 5-10.
Besides that, I don't think you have an idea of the difference between a rendering mesh and a useable one. Static rendering meshes can easily have many hundreds of thousands of polygons, which would need to be trimmed for a typical video game object.
Personally I'm very grateful that Coolhand has put effort into making the XR-2 useable by those of us who don't have top-notch computers. :tiphat:
Spacethingy
Multitasker
- Joined
- Sep 9, 2010
- Messages
- 1,515
- Reaction score
- 0
- Points
- 36
- Location
- Not the anti-matter universe
- Website
- spacethingy.weebly.com
Tchah! Tough competition, but methinks you was robbed Coolhand...
you was robbed Coolhand...
LOL. I'm sure everyone who won deserved it one way or another... The unfortunate thing is that the categories were all but setup to have popular franchise work take top billing, i'm surprised i got on there at all, and there are some shocking exclusions - but perhaps i should have posted some nominations for stuff i liked. (would have been nice to have categories for real time, or character work, or concept art and so on)
As far as renderings, i'm doing nothing that a modern realtime engine can't do, due to the carefully painted maps it translates well even into an older 3d engine.
Essentially, whatever tricks you apply, its the maps that are doing most of the work, and it should look in Orbiter, more like does in the renderings, not the other way around... With new engines we should be able to get a lot closer, if you have the hardware.
So really, Izack nailed it, you guys decide the spec, not me. If i'd said it was a couple of hundred thousand then i'm sure there would be many objections... I can't win, eh? That said, it really doesn't need many hundreds of thousands of polys. It's really not far off even todays standard for these things, in terms of poly count, and texel coverage. Its just missing a lot of modern tricks with the standard orbiter engine.
More room for improvement regarding maps & shaders rather than geometry at the moment, which has already been improved, the poly count upped over the last one. I'm sure its as good as anything else you can find in orbiter at the moment, and a lot better than most things you'll get for free online.
ercsim
Techie
- Joined
- Mar 7, 2011
- Messages
- 22
- Reaction score
- 0
- Points
- 0
MK II ")
Just thought of adding a few of the latest photos of the all mighty MKII from coolhand here::
http://www.scifi-meshes.com/forums/attachment.php?attachmentid=85401&d=1285696473
http://www.scifi-meshes.com/forums/attachment.php?attachmentid=85385&d=1285635981
http://www.scifi-meshes.com/forums/attachment.php?attachmentid=85626&d=1286333379
http://www.scifi-meshes.com/forums/attachment.php?attachmentid=85598&d=1286211820
http://www.scifi-meshes.com/forums/attachment.php?attachmentid=85386&d=1285636295
http://www.scifi-meshes.com/forums/attachment.php?attachmentid=85396&d=1285690283
Last edited:
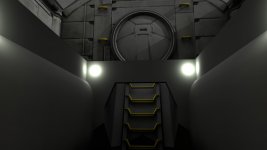
OK, i have a few updates for you all - start with this area, any ideas where we are located in this shot?
Also re-reading one of the comments, just to put peoples minds to rest; i'd like to say something about the 'multiple light sources' which is a myth I neglected to debunk last time. As you can see in this shot there are at least 4 light sources, a key (sun) light, an ambient light source and a couple of point lights for the interior, we can't have lots of point lights running inside orbiter, afaik, as it will slow things down.
So, as the post seems to imply, does this mean the interior will in reality be all dark and uninviting and that the renders are completely misleading?
No, of course not, as we don't need to have lots of point lights in the sim. We use a technique common to 3d graphics to pre-calculate lighting effects.
This should be obvious to anyone who has flown the mk1, which basically looks the same in game as it does in my renders... this is because we 'bake' (pre-calculate) the lighting into the textures. we also do this for ambient occlusion so these 'expensive' effects transfer directly to realtime. Essentially, via this technique, the quality of the renders is directly reflected in the final exported version.
The only thing it wont do is produce dynamic lighting effects, but since we typically have nothing moving around inside the cabin this is irrelevant anyway. Indeed, a lot of the renders i've posted here are using pre-calc lighting, as it looks basically indistinguishable from actually working out the point lights.
This technique basically covers 3 of the 4 light sources used in the attached render... since we already have a key light in orbiter, the sun, we have the final light source also.
Then finally in your realtime engine, all you need is a shadow casting key (sun) light, anti aliasing and shaders which support bump and specular - my shaders are not particularly fancy here - and you have basically the exact same setup as I have for renders. All of this is currently possible in orbiter depending on your setup and hardware.
Finally, lighting and texturing are intimately linked, ok its a 'fake' but one employed all the time in games, tv and movies. A common mistake in texturing is that surfaces are shown to be one continous colour. Ask yourself what colour is your ceiling, it might commonly be painted white (we'll assume that is the case with this example) and all too often someone will say, 'white' which is not untrue, but how it appears may be beige or grey - due to how its lit and how wide your eyes are. The final colour of a surface as we percieve it is dependent on lighting intensity, colour and angle and how much light your sensor, whether retina, CCD or photographic film, is exposed to.
Now, is percieved colour of your ceiling a constant blue, grey, beige, or brown? no, its shaded, some areas are darker or lighter or have different tones. so bear this in mind if you're working on a texture. Baking lighting effects can help achieve this shading and save you time in creating an effective, realistic looking texture by immitating these lighting effects which otherwise would be very expensive to calculate.
Attachments
Last edited:
is that the Airlock from the ladder in its belly? the only other place with a "door" like that is the link between vessel and CHM...
you're basically in an access space - maybe something along the lines of a jefferies tube - between the scrams, under the payload bay. The ladder deploys from the floor of the bay along a tube to enable access from the ground into the bay and also into the CHM (which is getting an interior this time i expect).
It is probably not an airlock unless you decided to use the CHM as one, its not something i expect to be simulated in the cockpit. Basically though the ladder is just a bonus the key feature is that it allows access to the payload bay from ground level. so this could be useful for anything from refuelling operations to deploying winch hooks, manipulators, jetpacks, munitions, supply drops etc... because as i understand it, if you deploy cargo when parked or hovering on a planet it will simply fall through the hull, so if for example a small rover cargo was positioned over the hole and dropped it could now pass through and be deployed to the surface of a planet.
It is probably not an airlock unless you decided to use the CHM as one, its not something i expect to be simulated in the cockpit. Basically though the ladder is just a bonus the key feature is that it allows access to the payload bay from ground level. so this could be useful for anything from refuelling operations to deploying winch hooks, manipulators, jetpacks, munitions, supply drops etc... because as i understand it, if you deploy cargo when parked or hovering on a planet it will simply fall through the hull, so if for example a small rover cargo was positioned over the hole and dropped it could now pass through and be deployed to the surface of a planet.
Attachments
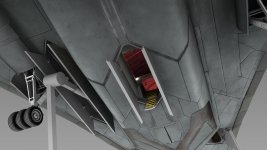
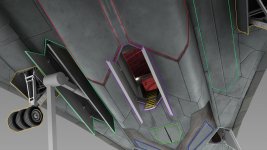
a "hole" between scram engines? sounds like its asking for trouble. but i suppose if you can make a spaceship that runs on magic, you can put a hole through anything safely 
what kind of payload do you imagine will "fall through" that hole btw, its awfully narrow for a rover
what kind of payload do you imagine will "fall through" that hole btw, its awfully narrow for a rover
jangofett287
Heat shield 'tester'
- Joined
- Oct 14, 2010
- Messages
- 1,148
- Reaction score
- 13
- Points
- 53
thought I'd have a go at guessing what is visible in this picture:
Purple: The under-body Access hatch Coolhand just revealed.
Red: The SCRAM Access Panels. (Also visible on XR2 MKI)
Yellow: The Underwing Gear. (obviously)
Turquoise: I suspect these may be underwing compartments, which I think Coolhand has mentioned at some point before.
Blue: SCRAM Intake doors.
Green: I think it is probably the front Hover jet cover.
White/Pastel Blue: Unknown.
NOTE: YMMV with what you see the colours as actually being.
Attachments
- Status
- Not open for further replies.
Similar threads
General Question
New cross-platform Orbiter 2024 port
- Replies
- 4
- Views
- 550
- Replies
- 17
- Views
- 7K
- Replies
- 0
- Views
- 449