Nozzle Design

reverend

Addon Developer
Addon Developer
Beta Tester
Joined
Apr 14, 2008
Messages
221
Reaction score
2
Points
18
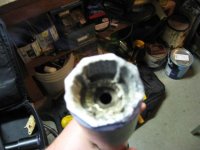
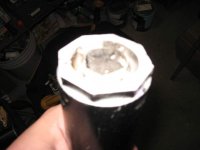
Seems as though the last design I used for my motor's Nozzles was a little poor (to say the least).

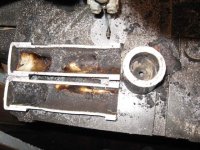
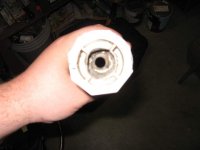
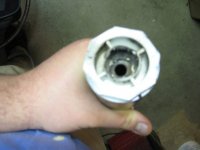
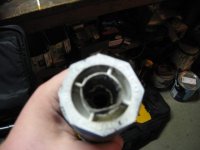
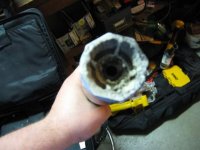
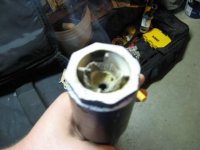
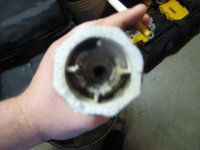
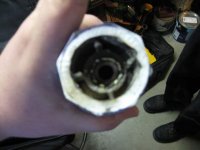
I've been trying to find a quick and easy way to make a good nozzles that doesn't require cutting steel on a lathe (which I don't have)...

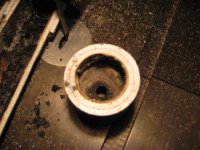
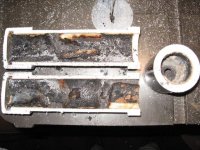
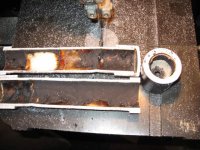
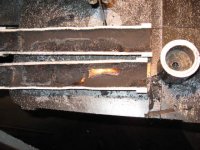
These were made with a PVC Bushing, a washer, and Hydraulic Cement. Perhaps the cement did not have enough time to setup before it was fired (i waited atleast 24 hours).

It's good that the throat (the washer) held up ok, but I definetely need to get a better design going to get reliable nozzles...

Here's the "autopsy" pictures from my last motors (static test video here: http://www.youtube.com/watch?v=55thy1WTh48 )
 

Attachments

  • auto-image001.jpg
    auto-image001.jpg
    25.8 KB · Views: 39
  • auto-image003.jpg
    auto-image003.jpg
    27.1 KB · Views: 20
  • auto-image004.jpg
    auto-image004.jpg
    30.2 KB · Views: 20
  • auto-image005.jpg
    auto-image005.jpg
    37.2 KB · Views: 18
  • auto-image010.jpg
    auto-image010.jpg
    33.6 KB · Views: 17
  • auto-image009.jpg
    auto-image009.jpg
    29.6 KB · Views: 17
  • auto-image008.jpg
    auto-image008.jpg
    32.4 KB · Views: 19
  • auto-image007.jpg
    auto-image007.jpg
    31 KB · Views: 15
  • auto-image006.jpg
    auto-image006.jpg
    38.2 KB · Views: 22
  • auto-image002.jpg
    auto-image002.jpg
    25.9 KB · Views: 20

reverend

Addon Developer
Addon Developer
Beta Tester
Joined
Apr 14, 2008
Messages
221
Reaction score
2
Points
18
More pics

Note that the deformations in the case did not occur until well after the firing was complete. As the heat permeated through the casing and removal from the motor mount clamps, it caused slight deformations.
 

Attachments

  • auto-image011.jpg
    auto-image011.jpg
    48.4 KB · Views: 19
  • auto-image012.jpg
    auto-image012.jpg
    64.3 KB · Views: 29
  • auto-image013.jpg
    auto-image013.jpg
    67.3 KB · Views: 21
  • auto-image014.jpg
    auto-image014.jpg
    63.3 KB · Views: 15
  • auto-image015.jpg
    auto-image015.jpg
    70.4 KB · Views: 21

reverend

Addon Developer
Addon Developer
Beta Tester
Joined
Apr 14, 2008
Messages
221
Reaction score
2
Points
18

ah yes, the quintessential nozzle design! Very good indeed! I would definetely love to make a true De Laval nozzle but I am lacking a lathe!

With a lathe I could mill a steel or titanium nozzle, or simply a wooden nozzle in the 'negative' shape to be used for molding cement or other hardened materials.

I also have a local machine shop that has offered to make parts for me but it's gonna be expensive.

I may do this at some point, but I'm currently working with PVC making single use motors. I don't really even want to make a disposable motor with a reusable nozzle...

I've heard that "Thai" brand Tile Grout works good. Maybe I'll print some specs for a de laval nozzle negative to be made out of wood by someone with a lathe so I can use it as a form for the Tile Grout. Hydraulic cement I think is still not out of the question as I'm not totally sure I let it harden long enough.

Graphite appears to be the best material for machining nozzles out of, but again, as expensive as working with metal nozzles.
 

Urwumpe

Not funny anymore
Addon Developer
Donator
Joined
Feb 6, 2008
Messages
37,616
Reaction score
2,337
Points
203
Location
Wolfsburg
Preferred Pronouns
Sire
Can get some parameters about the pressures and exhaust? The formula for the cross section is relatively simple, but it has to be designed for the chamber and exit conditions, otherwise it is ineffective.

Also, I would attempt anodized aluminum - anodizing aluminum is not too hard, the only chemical you need (sulfuric acid as electrolyte) can get bought for free. The rest is a power supply...
 

Urwumpe

Not funny anymore
Addon Developer
Donator
Joined
Feb 6, 2008
Messages
37,616
Reaction score
2,337
Points
203
Location
Wolfsburg
Preferred Pronouns
Sire
How do you get sulfuric acid?

You can order pretty concentrated solutions usually by retailers. I would just look for a local chemical trader. I know that it gets used for etching stone.

It is also used in lead-acid car batteries (33%).

It is regulated in the USA because "it might get used for producing chemical drugs". Which is again the result of listening to the "Waaaaaaaa! Make me safe!" crowd.

BTW:

http://www.engapplets.vt.edu/fluids/CDnozzle/cdinfo.html

Could this applet and the related information be of any use for you?
 
Last edited:

Art

New member
Joined
Nov 19, 2007
Messages
46
Reaction score
1
Points
0
Bentonite

Take cat litter (the cheap kind), a hammer, and some sort of drift or a bolt. Use the hammer and the drift (I use one about the same size as the motor itself) to pound the cat litter into the nozzle end of the motor. This results in a very hard solid mass of high-temperature resistant material in the end of the motor. I then use a spoon to slowly grind away a decent bell shape at the end. I then use a drill bit of the correct size to drill through the cat litter and the fuel grain. This keeps me from having to insert a porting mold into the grain when casting, and allows me to make sure my grains have no voids ( I can really pack the fuel into the mold or casing hard).
You may be suprised at just how amazingly tough the bentonite plug is.

The alternative is to break out 40 dollars and go to Harbour Freight tools and buy one of their sorry little pen lathes. I got a 48" lathe there...it works, but I had to do some welding on it to stiffen it up.
 

reverend

Addon Developer
Addon Developer
Beta Tester
Joined
Apr 14, 2008
Messages
221
Reaction score
2
Points
18
I like bentonite for small motors, but I feel it will not work well for the H/I/J motors i was seeking to make a nozzle for...

I did come up with a new desing which consisted of a PVC Coupler with a bunch of very small screws into it, filled with UGL Drylok Hydraulic Cement, and let harden. Hydraulic cement expands, so I haven't tried letting it harden with a stick in it, so I Then used the drillpress to make a sequentially larger hole thru the center until I reached the desired 3/8" diameter. I then inserted a 3/8" dowel, put some glue in and dropped in a 3/8" flat washer. The washer sunk in the glue and after the glue hardened, the dowel removed. I have not test fired this design yet, but I'm hopefull it will stand up.
 

RocketMan_Len

Member
Joined
Jun 22, 2008
Messages
149
Reaction score
0
Points
16
Location
Toronto, ON
Have you ever thought about *buying* pre-made nozzles...?

RCS Supplies http://www.rocketmotorparts.com/ sells assorted motor components, including phenolic nozzles in various sizes. They ought to be good for a couple of firings, depending on your propellant formulation. (They're single-use for AP-based propellants, but can be reused with less-energetic AN-based grains, or KN fuels...)

All you have to do is drill out the nozzle throat to the appropriate size...
 
Joined
May 10, 2011
Messages
65
Reaction score
0
Points
6
If you are going to be making many nozzles, it might be good to just build the lathe as well (at least a wood lathe, which you could use to form softer materials for use in a mold):

http://www.nobugs.org/engineer/woodlathe/index.html

This way, you can make many different nozzles with only a smallish cost for the infrastructure (assuming you dont already have those things lying around a workshop).
 

Warthaug

New member
Joined
Feb 28, 2010
Messages
7
Reaction score
0
Points
0
Location
Toronto (for now)
Website
imaginggeek.blogspot.com
Have you looked at Richard Nakka's webpage (http://www.nakka-rocketry.net/)? He's made a lot of engines like yours, and has some well-tested designs for PVC/cement based motors that work quite well (at least they did, 5 years ago, the last time I built/flew a home-brewed engine).

He has a whole series on PVC rockets, including on the casting of cement/washer nozzles.

From my experience, you probably did not let your nozzle set long enough. Residual moisture can destroy a nozzle; I always let mine dry for a week before use - I even baked a few of the larger ones in a low-temp (55C) oven for a few days to ensure complete drying.

Bryan
 
Top