Space Shuttle Simulator

TheShuttleExperience

Well-known member
Joined
Feb 24, 2021
Messages
919
Reaction score
1,195
Points
108
Location
Earth
But there‘ll be compromises. Not everything can look and be 100% like the real thing. The project already is ambitious enough...
 

TheShuttleExperience

Well-known member
Joined
Feb 24, 2021
Messages
919
Reaction score
1,195
Points
108
Location
Earth
This is all extremely interesting! I'll be following along with your progress. Thank you for sharing all of this with us!
Thanks for being interested! Maybe others can be inspired to create their own project as well. So we can share experiences.

This is likely the greatest „journey“ of my virtual space-life. Can‘t wait to progress. There will also be a YouTube channel...
 

TheShuttleExperience

Well-known member
Joined
Feb 24, 2021
Messages
919
Reaction score
1,195
Points
108
Location
Earth
News from the Space Food Systems Lab ?: the final version of the drinking bags are ready for testing and use :cool:

I sadly won't get the original accessories since they're only sold in quantity for NASA. So I ordered 100 blank aluminium spout bags elsewhere, 100 medical clamps, a few meters of silicone hose and made the labels. Well, the bags sadly can not be shipped before July 1st. But the trader sent me two examples for free, so that I could already finish this part of my project.

The different drinks you see on the labels already is the complete selection of available drinks for my project. All of them are actually available for real astronauts. The selection you see is what I would chose for a real mission. I thought 11 drinks (+ plain water) might be enough choice. The good thing is one can get everything as instant sticks ?

P1000043.JPG

The principle of the drinking bags is the same as for the original ones used aboard the ISS and formerly aboard the Shuttle. There is just no vacuum inside when empty, and therefore no septum adapter. Since my missions will last for only 24-72 hours, there is no need real for a vacuum anyway. The bags are filled with the corresponding instant through the 10mm spout with a funnel, no earlier than three days before launch. The bags are then "carried into orbit" with the spout closed. Once ready for crew meal/having a drink in orbit, the cap is screwed off from the spout, water from the galley is filled into the bag, and the straw is put into the spout. The Straw consists of two silicone hoses, originally made for the food industry. One 1/2 inch long with a diameter of 10mm goes into the spout, and the longer one (5 inches) goes into the short one. Simple and very effective.

My galley will include a small electrical water dispenser (behind the casing of course). It provides cold and hot water (90°C) by just one thin tap. Perfect for filling my spout bags and the food packages with water almost like one does in reality.

So, this is what the drinking bags look like:

IMG_5600.jpg

IMG_5599.jpg

Sadly my drinking bags are just shorter than the real ones. But I can live with that.

554298main_iss028e005912_hires.jpg


PS: btw, I also ordered the 2x2m PVC floor covering for the middeck floor two days ago...
 

Phil Smith

Donator
Donator
Joined
Jun 5, 2011
Messages
268
Reaction score
97
Points
43
Location
UK
Man, it's really cool! (y)(y)Now all you need is to acquire some Russian can food!! ?
I definitely include them in my simpit if you dont mind :probe:
Did you check holding force of this tiny circular velcro pads? Are they enough to hold full bag at the earth's gravity?

Please keep us updated!
Cheers!
 

TheShuttleExperience

Well-known member
Joined
Feb 24, 2021
Messages
919
Reaction score
1,195
Points
108
Location
Earth
Man, it's really cool! (y)(y)Now all you need is to acquire some Russian can food!! ?
This would come into question for the later Shuttle-MIR/Shuttle-ISS missions sometime in the distant future ?

The drinking bags look even better when your're holding them in your own hands. The photos aren't really good (the lighting isn't good in the lab). I expected that the final result might look good. But it looked way better than expected once put together. It was amazing and a very satisfying moment. If things continue like that, I might be a very lucky person sometime late next year...

I also might prepare the first samples of food next week (real vacuum packaging). The lab isn't ready yet, but close to.
I definitely include them in my simpit if you dont mind :probe:
There is no copyright :cheers:

Did you check holding force of this tiny circular velcro pads? Are they enough to hold full bag at the earth's gravity?
I don't know what you are referring to. There is no gravity in orbit! ?

Yes. You can stick it to an upright wall in any direction. Even upside down on just one velcro pad. You almost have a hard time removing it again once empty, even from that little velcro. I bet in zero gravity enough velcro can even hold hundreads of kilograms in place. I now know why NASA uses this technique. I am only concerned if the closed straw holds against the pressure of the fluid when upside down for some time. I'll have to test this...
 

TheShuttleExperience

Well-known member
Joined
Feb 24, 2021
Messages
919
Reaction score
1,195
Points
108
Location
Earth
Please keep us updated!
Cheers!

So let's get started! Construction has finally begun today :cool:

I cleaned the floor, rolled out the PVC covering for the mid-deck's floor and fixed it with almighty Duck Tape in best NASA fashion. The colour turned out to be exactly what I wanted it to look like ? I ordered it online. The surface is 2 x 2 m just like the intended interior of the mid-deck. But I ordered 2 x 2.5 meter to get a piece of 2 x 0.5 m for testing how to draw all the access panels and screws and stuff onto the floor. The first test looks very promising (I will post photos of that later). I think it is a good idea to have this part finished first, before actually building the base frame and floor panels and then not having enough space anymore for drawing the access panels onto the floor.

Floor 1.JPG

Floor 2.JPG

Floor 3.JPG

Fllor 4.JPG

Now the challenge is to get all the tiny details onto the floor with just a black and grey permanent marker...

Fllor 5.jpg
 

Phil Smith

Donator
Donator
Joined
Jun 5, 2011
Messages
268
Reaction score
97
Points
43
Location
UK
Congratulations, man! You're really Lucky to have such space available!! :hailprobe: ?
Is it the final place for the sim or just assembly facility??? :))))
 

TheShuttleExperience

Well-known member
Joined
Feb 24, 2021
Messages
919
Reaction score
1,195
Points
108
Location
Earth
Congratulations, man! You're really Lucky to have such space available!! :hailprobe: ?
Is it the final place for the sim or just assembly facility??? :))))
Yeah it's really a privilege :) The entire apartment actually just is for my hobby... ?

It is the final place but not the final position though. The room is altogether: assembly, mockup and training facility. My desk is standing next to the simulator. There is even enough space left for adding a furtuer small module to the airlock hatch later, like a small interior replica of Spacelab, Mir or ISS. And one more little space between the sim and the windows of the room. I will use it for a small training device (big TV + seat) for flights with the Talon T-38 or for quick traning lessons for entry and landing and something like that.
 

TheShuttleExperience

Well-known member
Joined
Feb 24, 2021
Messages
919
Reaction score
1,195
Points
108
Location
Earth
A little update regarding the floor...

IMG_5622(1).jpg

The floor will be almost finished next week. Looks exactly as expected. Cheap and simple solution to get an even and nice looking surface. Although it will include velcro and small metall mounts in the aft portion once laid.

I think I might also finish the flightdeck's floor before building the frame and running out of space...
 

Phil Smith

Donator
Donator
Joined
Jun 5, 2011
Messages
268
Reaction score
97
Points
43
Location
UK
Yeah, the floor looks quite right and simple! Looking forward to see the shell construction :hailprobe:
Yeah it's really a privilege :) The entire apartment actually just is for my hobby... ?

It is the final place but not the final position though. The room is altogether: assembly, mockup and training facility. My desk is standing next to the simulator. There is even enough space left for adding a furtuer small module to the airlock hatch later, like a small interior replica of Spacelab, Mir or ISS. And one more little space between the sim and the windows of the room. I will use it for a small training device (big TV + seat) for flights with the Talon T-38 or for quick traning lessons for entry and landing and something like that.
you lucky.. man! (y)? keep it comin!
 

Notebook

Addon Developer
Addon Developer
News Reporter
Donator
Joined
Nov 20, 2007
Messages
11,813
Reaction score
640
Points
188
Very good, what are you going to do when the neighbours come back?
 

Phil Smith

Donator
Donator
Joined
Jun 5, 2011
Messages
268
Reaction score
97
Points
43
Location
UK
Man, do you have some photos of the real cockpit structure?? I found none, only some external shots (see last 3 pics in the attachments)..

But I dug up some Buran's pics, maybe them could help you as both SS and Buran share almost the same geometry. I'll certainly use this photos as a reference to my pit design.
 

Attachments

  • Buran cockpit 01.jpg
    Buran cockpit 01.jpg
    90.9 KB · Views: 18
  • Buran stripped cockpit 02.jpg
    Buran stripped cockpit 02.jpg
    121.4 KB · Views: 15
  • Buran stripped cockpit 03.jpg
    Buran stripped cockpit 03.jpg
    110.3 KB · Views: 13
  • Buran stripped cockpit 04.jpg
    Buran stripped cockpit 04.jpg
    75.1 KB · Views: 12
  • Buran stripped cockpit.png
    Buran stripped cockpit.png
    983.8 KB · Views: 15
  • S5000227-Mating_of_fuselage_and_crew_compartment,_OV-105.jpg
    S5000227-Mating_of_fuselage_and_crew_compartment,_OV-105.jpg
    139.7 KB · Views: 15
  • KSC-00PP-0990.jpg
    KSC-00PP-0990.jpg
    135.2 KB · Views: 15
  • ku-bigpic.jpg
    ku-bigpic.jpg
    97.8 KB · Views: 18
  • Original size.zip
    5.3 MB · Views: 0

TheShuttleExperience

Well-known member
Joined
Feb 24, 2021
Messages
919
Reaction score
1,195
Points
108
Location
Earth
Yeah, the floor looks quite right and simple! Looking forward to see the shell construction :hailprobe:

you lucky.. man! (y)? keep it comin!
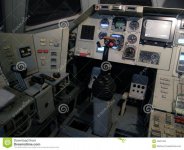
Well, the shell won't be really something special. I will send photos of course...

I hope to be still lucky once this sim stands in the middle of the room, and everything turned out to work and look as expected ?

Man, do you have some photos of the real cockpit structure?? I found none, only some external shots (see last 3 pics in the attachments)..

But I dug up some Buran's pics, maybe them could help you as both SS and Buran share almost the same geometry. I'll certainly use this photos as a reference to my pit design.
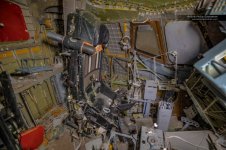
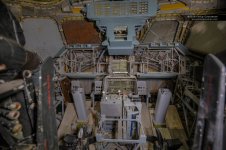
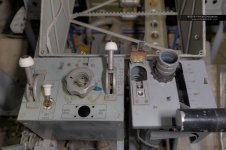
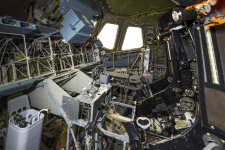
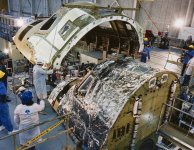
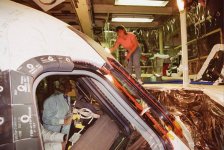
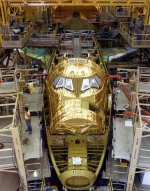
Sadly not. Actually I don't have any photos of the structure. But nice findings so far ?

The shell of my sim won't have anything in common with Shuttle. It's just a simple structure to support the sidewalls, hatches and roof of the middeck, and the weight of the flightdeck. The flightdeck on top won't even have a structure. It will just consist of modules that can be put together (main instrument panel, front windows, left and right console + windows, forward roof, aft left and right consoles, aft station, and aft roof). It might look a little bit like an ordinary full motion flight simulator from the outside. Just like a movie set: once you go inside, you'll find yourself in a different world. I will cover the structure with thin MDF panels and paint it white. I might add picture frames for NASA drawings, photos and mission insignia and also a rack for the flight data file.

Talking about Buran, you might have seen this...

 
Last edited:

TheShuttleExperience

Well-known member
Joined
Feb 24, 2021
Messages
919
Reaction score
1,195
Points
108
Location
Earth
Invite them for the first mission as crewmembers, of course! With extra space food and a working Space toilet.?
There wouldn't be enough space ? Actually anything beyond one person would be inconvinient after a few hours. But nobody in the neighbourhood knows about my autistic hobby anyway ?
 

TheShuttleExperience

Well-known member
Joined
Feb 24, 2021
Messages
919
Reaction score
1,195
Points
108
Location
Earth
Today I finally got the wood for the base frame (y) That's one small step for a man, but one heck of a leap for his project :hailprobe:

This morning I took a look at three different DIY markets. The first one got plenty of construction timber, but not what I want. The second one had almost no construction timber in stock. And the delivery time ranges from 8 weeks up to unknown in both markets still due to the pandemic, and "the Chinese" buying all our wood allegedly. Damn. That's where the frustration started. But I gave it one another chance. So in the third market there wasn't too much construction timber either. B U T they had plenty of exactly what I need for my project! :probe:

And who says one can not get 12x3m timber (78x78mm profile) in a small crossover SUV? :D

IMG_5657.JPG

Just to give you an idea how it will look like:

IMG_5661.JPG

There'll be 12x of the vertical timber and one another frame on top for housing the middeck roof and supporting the flight deck floor.

I also found the perfect material for all the interior wall covering: white PVC panels. It's very lightweight, very flexible and easy to work with. Plus I don't have to paint it since it's already white. But I will order this online...

Apropos lightweight: weight is something I really should consider I guess. This beast could easily become as heavy as a big piano. So I should focus on lightweight materials.
 
Top