You are using an out of date browser. It may not display this or other websites correctly.
You should upgrade or use an alternative browser.
You should upgrade or use an alternative browser.
The Universal Flight Simulator
- Thread starter Phil Smith
- Start date
Hey guys! Long time no see!
Sorry for not posting so long - I've been very busy since summer.. Right now I've been slowly but surely prototyping a new revision of the primary MFD module - two halves are printed (each took approximately 11.5 hours..) and superglued together. Now it's all self contained bezel (no wires on the outside!) with three db9 connectors (upper MFD, lower MFD, display control). Now it's time to etch some keypad PCBs..")
Spacial thanks to Jdat for his support at software side of things!
Sorry for not posting so long - I've been very busy since summer.. Right now I've been slowly but surely prototyping a new revision of the primary MFD module - two halves are printed (each took approximately 11.5 hours..) and superglued together. Now it's all self contained bezel (no wires on the outside!) with three db9 connectors (upper MFD, lower MFD, display control). Now it's time to etch some keypad PCBs..
Spacial thanks to Jdat for his support at software side of things!
Attachments

I thought this was not possible in Orbiter? As in the sim was not able to support multiple screens in that way, or am I just outdated?Oh, cost... I guess cost and space are our 2 main contains..
In 2017 we built a simpit for a STEM education company in Mongolia. To be used with both Orbiter and FSX. using mostly JoytoKey if I remember, that covered most everything if I remember. We are currently looking to expand upon this original idea in Mexico. however, we are looking for a way to use software that can take us from a runway to orbit in much the same way as Orbiter, yet there really isn't anything out there. I wonder if Orbiter is back in play now? 


Attachments

JMW
Aspiring Addon Developer
In 2017 we built a simpit for a STEM education company in Mongolia. To be used with both Orbiter and FSX. using mostly JoytoKey if I remember, that covered most everything if I remember. We are currently looking to expand upon this original idea in Mexico. however, we are looking for a way to use software that can take us from a runway to orbit in much the same way as Orbiter, yet there really isn't anything out there. I wonder if Orbiter is back in play now? View attachment 27644View attachment 27642View attachment 27643
Just search "multi screen simpit"
Not into it myself but many are.
I thought this was not possible in Orbiter? As in the sim was not able to support multiple screens in that way, or am I just outdated?
There are addons, who allow run orbiter over many computers in network with goal to make multiscreen simpit system. I already made some tests and it looks like good altenative to complex multiprojector setup.
Last edited:
GodAtum
Active member
What addons are these please?There are addons, who allow run orbiter over many computers in network with goal to make multiscreen simpit system. I already made some tests and it looks like good altenative to complex multiprojector setup.
would like to second that...any idea what addons these are?There are addons, who allow run orbiter over many computers in network with goal to make multiscreen simpit system. I already made some tests and it looks like good altenative to complex multiprojector setup.
- Joined
- Mar 15, 2008
- Messages
- 324
- Reaction score
- 3
- Points
- 18
Fun project! Looks great.
Hey guys!
Little heads up here.
Right now things are slowed down little bit due the world situation, but the pit still is in its developing stage.
Almost done with Rev. C of PMFD and Rev D of AMFD. When I'll have some assebled hardware (not pics from CAD lol) I'll share them with you.
Little heads up here.
Right now things are slowed down little bit due the world situation, but the pit still is in its developing stage.
Almost done with Rev. C of PMFD and Rev D of AMFD. When I'll have some assebled hardware (not pics from CAD lol) I'll share them with you.
Yeah, ORB Connect + VNCMFD work quite well actually.it's called ORB: connect 3:19v ...i think that's what they are talking about
Thanks!Fun project! Looks great.
Hey guys!
Long time no see
After almost half a year of R&D I'm finally ready to assemble new revision C of primary and auxiliary MFD's.
Some specs:
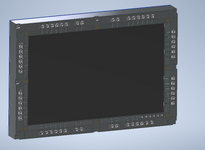
Primary MFD panel (PMFD):
Auxiliary MFD panel (AMFD):
Both MFD frames are built on a 3mm thk laser cut aluminum backplate, which is also used as a fixture for assembling and gluing all 18 3d printed pieces for PMFD and 6 pieces for AMFD.
Now all bezel buttons are surplus soviet stuff, each button contains two separate micro-switches.
Controller modules for both MFDs are still in R&D stage.
In next post I'll show some pictures of frames design and manufacturing.
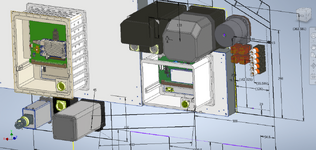
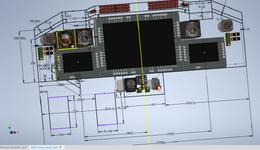
Right now I'm attaching some overall shots of both MFDs in Inventor and basic concept of the MIP.
Long time no see
After almost half a year of R&D I'm finally ready to assemble new revision C of primary and auxiliary MFD's.
Some specs:
Primary MFD panel (PMFD):
- Screen - 24 inch Samsung S24E650 LCD.
- Resolution - 1920:1200 px.
- Aspect ratio - 16:10.
- Controller module - Raspberry Pi 3 model B.
- RAM - 1 Gb.
- Internal storage - 32 Gb SD card.
- Number of simultaneously running MFDs - 4.
- Total number of bezel buttons - 62 pcs (14 pcs per each MFD, 6 buttons are for LCD control).
- Dimensions of the panel (with controller module) - 612x418x65 mm (74 mm with switch guards).
- Panel mass without controller module - 10.2 kg / 22.5 lbs.
- Interface - LAN.
- Power requirements - +27(+3/-5) VDC, 50 VA; 3A circuit beaker.
Auxiliary MFD panel (AMFD):
- Screen - 10 inch Samsung Galaxy Tab 2 tablet.
- Resolution - 1280:800 px.
- Aspect ratio - 16:10.
- Controller module - TI OMAP4430 (tablet/screen) / ESP32 (interface module).
- RAM - 1 Gb.
- Internal storage - 16 Gb.
- Number of simultaneously running MFDs - 1.
- Total number of bezel buttons - 14 pcs.
- Dimensions of the panel (with controller module) - 315x215x53 mm (62 mm with switch guards).
- Panel mass without controller module - 1.85 kg / 4.10 lbs.
- Interface - LAN.
- Power requirements - +27(+3/-5) VDC, 20 VA; 1A circuit beaker.
Both MFD frames are built on a 3mm thk laser cut aluminum backplate, which is also used as a fixture for assembling and gluing all 18 3d printed pieces for PMFD and 6 pieces for AMFD.
Now all bezel buttons are surplus soviet stuff, each button contains two separate micro-switches.
Controller modules for both MFDs are still in R&D stage.
In next post I'll show some pictures of frames design and manufacturing.
Right now I'm attaching some overall shots of both MFDs in Inventor and basic concept of the MIP.
Attachments
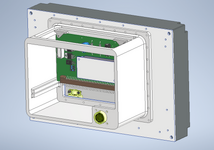

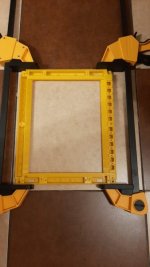
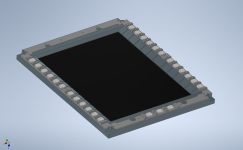
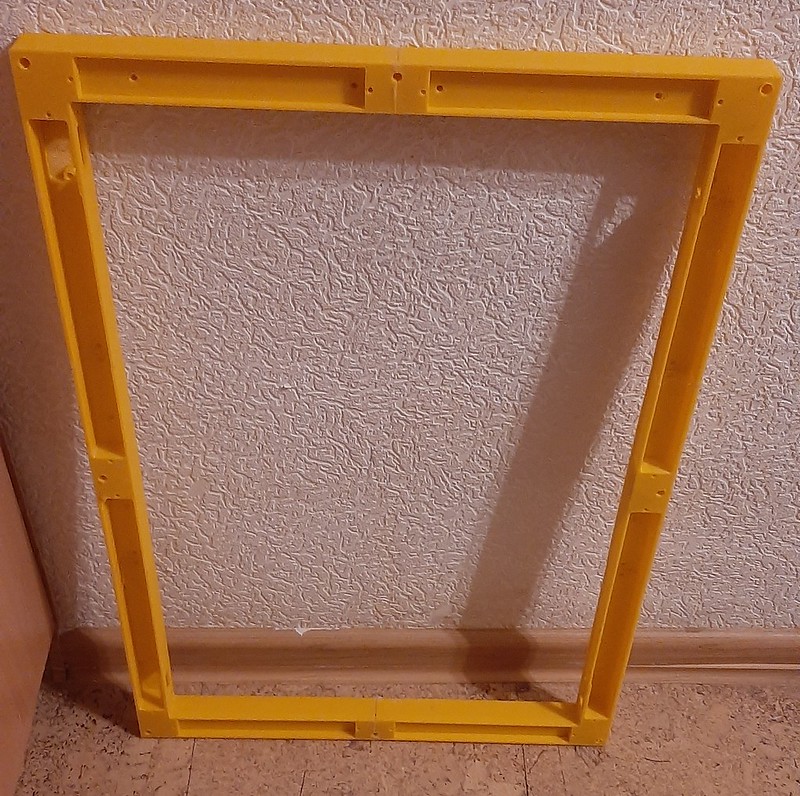
Building of the PMFD.
PMFD frame consists of a 3d printed bezel and a 3mm THK 6061 aluminium backplate.
Both monitor and bezel are mounted on the backplate.
The 3d printed bezel is assembled from 18 parts (3 layers, 6 pieces each) and glued together using backplate as a fixture. All imperfections, such as gaps, etc., are filled with body filler and sanded, which gave quite a neat result.
Bottom layer parts are printed and glued:
 01
01
 02
02
Middle layer pieces are printer and glued along with top layer:
 03
03
 04
04
 06
06
All 3 layers (18 parts) are now glued together for good
 07
07
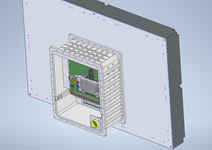
Building of the AMFD.
Overall design is similar to the PMFD, just on a little bit smaller scale.
The 3d printed bezel is assembled from 6 parts (3 layers, 2 pieces each) and glued together using backplate as a fixture.
I didn't take a lot of pictures during assembly, but found this one - bottom 2 parts are glued together on the backplate:
 08
08
Next post will be dedicated to sanding and painting
PMFD frame consists of a 3d printed bezel and a 3mm THK 6061 aluminium backplate.
Both monitor and bezel are mounted on the backplate.
The 3d printed bezel is assembled from 18 parts (3 layers, 6 pieces each) and glued together using backplate as a fixture. All imperfections, such as gaps, etc., are filled with body filler and sanded, which gave quite a neat result.
Bottom layer parts are printed and glued:
01 02 Middle layer pieces are printer and glued along with top layer:
03 04 06 All 3 layers (18 parts) are now glued together for good
07 Building of the AMFD.
Overall design is similar to the PMFD, just on a little bit smaller scale.
The 3d printed bezel is assembled from 6 parts (3 layers, 2 pieces each) and glued together using backplate as a fixture.
I didn't take a lot of pictures during assembly, but found this one - bottom 2 parts are glued together on the backplate:
08 Next post will be dedicated to sanding and painting


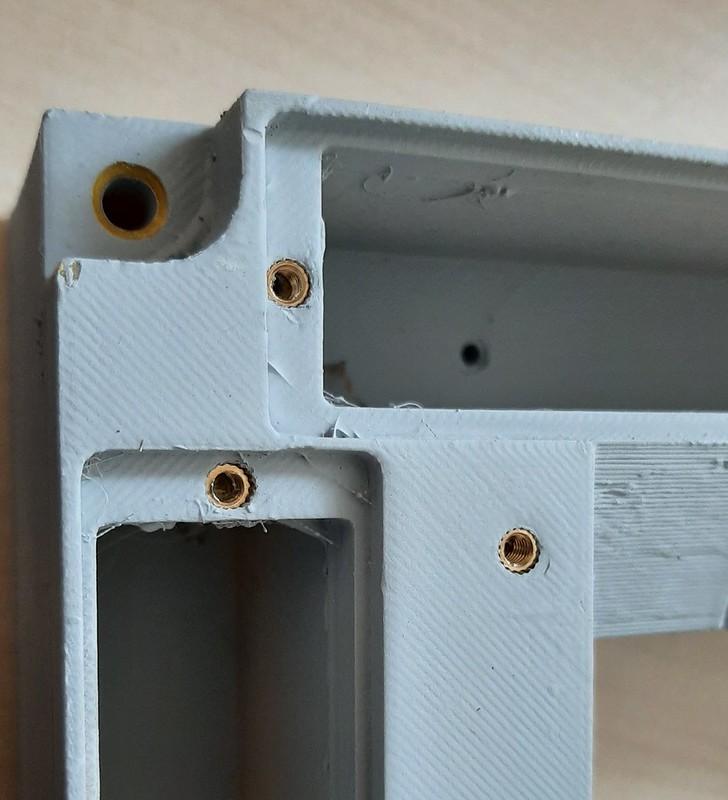


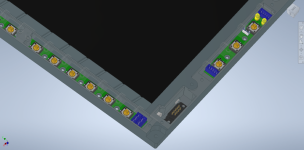
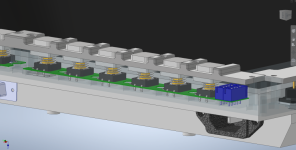
MFD switch assemblies.
Each assembly is pre-made soviet surplus stuff grouped by 6 and 2 switches. Double micro-swithes for redundancy xD I just added 1n4148 diodes to each switch and db9/db15 connectors for ease of future assemble/disassemble.
Switch actuation force is around 4-6 N, which feels quite good and sturdy.
Button caps are randomly coloured from the factory (colour variation is present even in one assy - no hecks were given I guess) and beg to be replaced lol
 20
20
 21
21
 22
22
 23
23
These switches alone took me around 3-4 working days of soldering - oh my..
Just need to lace those looms properly.
Oh, that's it for now.

Each assembly is pre-made soviet surplus stuff grouped by 6 and 2 switches. Double micro-swithes for redundancy xD I just added 1n4148 diodes to each switch and db9/db15 connectors for ease of future assemble/disassemble.
Switch actuation force is around 4-6 N, which feels quite good and sturdy.
Button caps are randomly coloured from the factory (colour variation is present even in one assy - no hecks were given I guess) and beg to be replaced lol
20212223These switches alone took me around 3-4 working days of soldering - oh my..
Just need to lace those looms properly.
Oh, that's it for now.
Nice work!!!
I'm wondering how is the VNCMFD stuff advancing?
I'm also developing an MFD and my only issue right now it to have a full screen MFD.
I think the VNCMFD could be my solution., i just need more info about that.
I create my own Orbiter Plugin as an External MFD that manage all the button info and button press.
So for that part it so far so good.
In my External MFD, of course i remove the frame and button to keep just the MFD itself. (see picture)
The problem with that way it the window (MFD) must be square.
For that reason, i have a gap (black) on right side of the screen.
The screen resolution it everything except square.
I'm hoping that problem can be solve with the VNCMFD.
with VNCMFD Is it possible to resize the window to a non square view resolution? (example 1024 x 768 resolution).
Again nice work on your project.
Attachments
Thank you, man!Nice work!!!
I'm wondering how is the VNCMFD stuff advancing?
I'm also developing an MFD and my only issue right now it to have a full screen MFD.
I think the VNCMFD could be my solution., i just need more info about that.
I create my own Orbiter Plugin as an External MFD that manage all the button info and button press.
So for that part it so far so good.
In my External MFD, of course i remove the frame and button to keep just the MFD itself. (see picture)
The problem with that way it the window (MFD) must be square.
For that reason, i have a gap (black) on right side of the screen.
The screen resolution it everything except square.
I'm hoping that problem can be solve with the VNCMFD.
with VNCMFD Is it possible to resize the window to a non square view resolution? (example 1024 x 768 resolution).
Again nice work on your project.
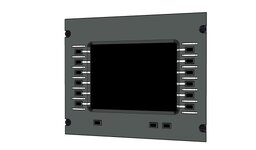
Great design you got there too! Don't worry about squareness of the LCD - you will have square MFD field in the center and visual buttons at both sides - using VNCMFD you can easily set screen coordinates and size for each MFD entity via .cfg file.
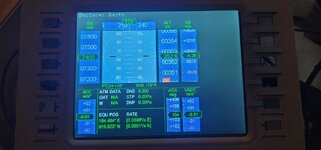
Here's how it looked on my previous revision of the panels:
 test
test Some testing 01
Actually, I don't need to side button on the screen.
Each physical side button on my design are small LCD pushbutton.
They are just big enough to print from 3 to 4 characters on each LCD.
I should took picture when I did the LCD pushbutton test but I didn't.
But it working great.
That why you was not seeing any screen button on my picture and that why I need to find a solution to be able to fit the image
on full size of the screen.
For now, the square stuff it giving me headache.
By now, I'm trying different screen resolution to have one close as possible to square,
and searching another monitor (from 8 to 10 inches) that will be square.
My actual monitor it a 8 inches one, they were saying 4:3 but in fact it 16:9.
TheShuttleExperience
Well-known member
Awesome!

Just discovered the Saturn V drawing in the background
 It's the one I will print as a poster (via online service) and put it into a 60x90cm picture frame.
Haha! Thanks!Awesome!
Just discovered the Saturn V drawing in the background
Yep, first picture shows ithe first iteration of the poster, later I've re-ploted it with better quality and put it in proper A2 frame (can be seen on the 2nd pic in shadows  )
)
Last edited:
Similar threads
- Replies
- 74
- Views
- 16K
- Replies
- 0
- Views
- 5K
- Replies
- 7
- Views
- 4K
- Replies
- 1
- Views
- 9K